
Contents - Introduction - Prerequisites - Part 1: Ubuntu software management - Check and update your Ubuntu Installation - Ubuntu installations - Ubuntu Personal Package Archives (PPA) - Snapcraft - The app store for Linux - Part II: SPIDE components - GIS packages - GDAL - QGIS - GRASS - Anaconda - Eclipse - Snap installation - Controlled installations - PostgreSQL - Create a new role reflecting your machine user - Postgres GUI - Part III: Editing and publishing apps - Atom - Jekyll - Create site and start Jekyll - GitHub and GitHub Desktop - Part IV: Media tools - ImageMagick - FFmpeg
Introduction
This post contains four main parts. The first part introduces how to install and manage software in Linux Operating System (OS) Ubuntu 20.04 (Focal Fossa). The second part goes through the steps for installing all software components required for a Spatial Data Integrated Development Environment (SPIDE). The installed software match the requirements of Karttur’s GeoImagine Framework. The third part covers installations of additional software for text editing, handling Git repositories and publishing this blog. In the fourth part you will install command-line tools for image and video processing. These tools are required by processes in Karttur’s SPIDE related to exporting map layouts and animations of map time series.
The instructions are shorthand and refer extensively to online resources with more elaborate and detailed information. Perhaps the best source for hints and tricks on how to get different software packages to work in Linux is Linux Hint. The instructions focuses on using the Terminal, it you prefer to use the Graphical User Interface (GUI), try out the Ubuntu Software Center.
The instructions summarises my other blogs on Install and setup spatial data IDE, Setup Jekyll Theme Blog, Set up blog tools: Jekyll and Atom and Setup GitHub pages. These other blogs were written for mac osx.
Prerequisites
This post assumes that you have already installed Ubuntu 20.04 on your machine.
Login or startup your Linux machine
If you have a local Linux machine just power up and login as usual. If coneceting to a sever use the terminal for your operating system:
$ ssh user@machine.domian.country
Part 1: Ubuntu software management
Check and update your Ubuntu Installation
To check the version of your Ubuntu installation, open the Terminal (pressing the keys [ctrl]+[alt]+[T] simultaneously will do that), and enter the command:
$ sudo lsb_release -a
To update and then upgrade your installation, use the two following commands:
$ sudo apt update,
and then
$ sudo apt upgrade.
To execute both commands together, including answering yes if, and when, asked to proceed, instead write:
$ sudo apt update -y && sudo apt upgrade -y
Install Curl
You will need Curl fro downloading installation packages further on:
$ sudo apt-get install curl
Install GCC
<>sudo apt install build-essential<>
Verify that the GCC compiler is successfully installed by running the following command that prints the GCC version:
<>gcc --version<>
Ubuntu installations
The usual manner in which to add packages (applications, or apps) from the terminal is to use the command sudo apt install:
$ sudo apt install "package"
The install command searches repositories (online libraries) for the package and then installs it, if found. When you install Ubuntu, the default repository for your version is included. You can see which repositories are included by starting the app Software & Updates. The official documentation for Ubuntu contains a good page on Repositories, and on Repositories/Commandline.
To start an app in Ubuntu, click the [window] key or the [Show Application] icon in the screen, either will open the Type to search … box, in which you start writing (e.g. “Software & Updates”), when the app you search for appears double click to launch it in the usual manner.
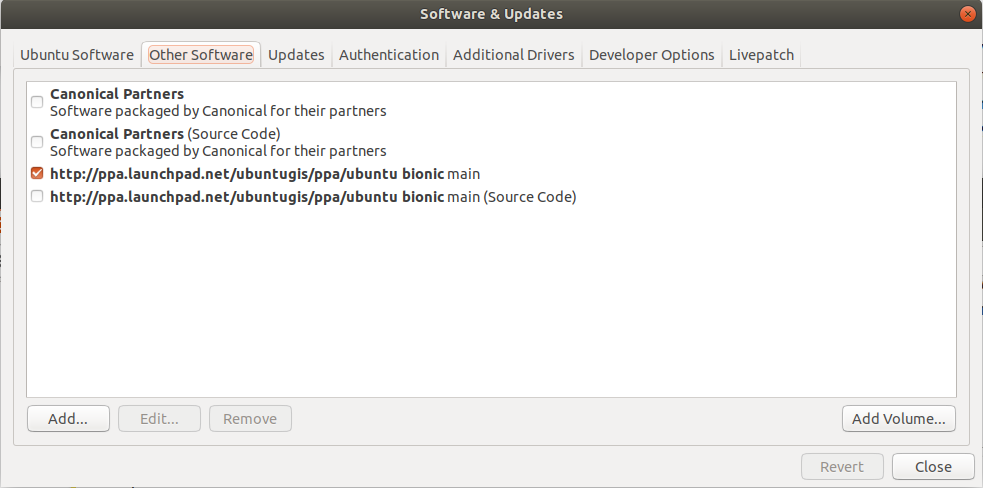
In the main window of Software & Updates click the tab Other Software and you will see the linked repositories. You can directly add, edit or delete repositories in Software & Updates. It is, however, faster and more safe to use the Terminal.
The list of repositories in Software & Updates comes from a text file ~/etc/apt/sources.list (where the tilde “~” denotes your home directory). To inspect the file from the Terminal, open it using the minimalistic text editor pico with the command:
$ pico /etc/apt/sources.list
You will not be able to edit the file unless you open it as the system administrator using sudo and then also give the correct password:
$ sudo pico /etc/apt/sources.list
Ubuntu Personal Package Archives (PPA)
Less commonly used Ubuntu packages, or later versions of the more common, are not available via the default repositories. To access additional packages (or more updated/nightly built etc versions) you need to app, sorry add, the Personal Package Archives (PPA) in which they reside. The general idea and access to PPA are described in the article How to Add or Remove PPA in Ubuntu Using GUI and Terminal.
Karttur’s GeoImagine Framework rely on a set of packages for spatial data processing, and, very conveniently, there is a PPA for Ubuntu dedicated to Geographical Information Systems (GIS): ubuntugis. Even if the default Ubuntu repository includes some GIS packages, the ubuntugis PPA is more up to date and also includes additional packages.
To add the ubuntugis repository to your system (i.e. to the file sources.list) run the following command in the terminal window:
$ sudo add-apt-repository -y ppa:ubuntugis/ppa
followed by an update of the system for package installations:
$ sudo apt-get update
If you now check the file sources.list, for example by using Software & Updates you should see the link to ubuntugis/ppa under the tab Other Software.
For other alternatives on adding/removing repositories and managing the file sources.list see the article on How to Add or Remove PPA in Ubuntu Using GUI and Terminal.
Snapcraft - The app store for Linux
Snap, or snappy, is an alternative software deployment and package management system for Linux OS created by Canonical. The main page for snap is snapcraft.io - The app store for Linux. Linux 20.04 is prepared for using snap and you will use snap for some installations later in this post. In case it does not work, please refer to the official snapcraft page on installing snap on Ubuntu. To learn more about snap, have a look at the page How to install and use Snap on Ubuntu.
Part II: SPIDE components
GIS packages
In this section you are going to install three GIS software packages: GDAL, QGIS and GRASS. How to install these packages on macos is described in this page.
The latest version of the GIS software packages that you are going to install are available from the UbuntuGIS-Stable PPA (ubuntugis/ppa), that you added above. If you visit the UbuntuGIS-Stable PPA, you can see all spatial data processing packages available via this PPA.
GDAL
Install the latest version of the Geographic Data Abstraction Library (GDAL) (3.2.2 at time of writing in March 2021) by the following terminal command:
$ sudo apt -y install gdal-bin python3-gdal
If you are using Python 2, replace “python3” with “python2”.
Confirm that the installation went through and the version of GDAL installed, by typing:
$ gdalinfo --version
QGIS
How to install QGIS depends on how you intend to use it. I use QGIS mainly as a viewer; all actual processing in Karttur’s GeoImagine Framework are done using Python, GDAL and GRASS. Hence I do not bother too much about my QGIS version, and I can install it with the standard command as described in the QGIS Installers page:
$ sudo apt-get install qgis qgis-plugin-grass
At time of writing (April 2021) this installs the latest Long-Term-Supported (LTS) version 3.16.4 (Hannover). If you want to get a particular version it gets rather more complicated, as described by Shahriar Shovon How to Install and Get Started with QGIS 3 on Ubuntu 18.04, or the youtube video Lesson 1: Installing QGIS 3.10 on Ubuntu 20.04.
GRASS
The latest GRASS version is available via ubuntugis/ppa and you can install it by typing (as outlined on the official GRASS page on Download GRASS GIS for Linux):
$ sudo apt-get install grass
Anaconda
Anaconda is a free and open-source Python (and R) distribution for scientific computing that simplify package management and deployment. In Karttur´s GeoImagine Framework Anaconda is the core package manager for linking hundreds of Python packages together. My installation instructions for mac osx is here.
GUI installation
The official Anaconda instructions for Installing on Linux, starts by telling how to setup your system to also include the GUI (Anaconda Navigator), which I do not use. So just skip that part unless you want to use the GUI rather than the Terminal for managing anaconda/conda.
You can also follow the shorthand instuctions by Lisa Tagliaferri, or just go for the minimalistic solution suggested here:
Go to the Anaconda official downland page, or click directly on the link to get the 64-Bit (x86) Installer (517 MB).
The download should end up in your Downloads folder. You can check the download (md5) and then run the installation shell script (the file you actually downloaded) by calling bash while giving the full path to the downloaded installer:
$ bash ~/Downloads/Anaconda3-2019.07-Linux-x86_64.sh
Answer yes to all questions and use the [enter] key to flip over the license agreement, and accept it (if you find the text agreeable).
If you answered yes to all questions, your installation will be complete and ready. But you need to stop and restart the terminal to let it take effect. Then you can test if it worked by writing:
$ conda -V
Doing the installation in April 2021 I ended up with version 4.7.10.
To update your Anaconda installation write:
$ conda update conda
In my case, conda got updated to version 4.10.1.
To list all the packages available with your conda installation:
$ conda list
In Karttur’s GeoImagine Framework, conda is used for setting up virtual python environments that are then used by Eclipse (installed in the next section).
Eclipse
Eclipse is a Java based Integrated Development Environment (IDE). It is flexible and extensible and the IDE that I use for developing Karttur’s GeoImagine Framework. Instructions for Mac OSX “Setup Eclipse for PyDev” are more extensive compared to the shorthand notes below. Including on how to setup Eclipse for PyDev and how to write some basic python programmes. Once you have finished the installation for Ubuntu below you can thus learn more by checking Setup Eclipse for Python development.
There are (at least) two ways to go about the Eclipse installation: either via the Eclipse Installer or using snap. snap is easier, but the package installer gives more control. I recommend to use the package installer.
But before you can proceed you need to check your machine Java Development Kit.
Java Development Kit (JDK)
Check out the Java installation by typing:
$ java -version
If you get a response, just skip this part. if you get Java related errors when installing Eclipse in the next section, return to this section and follow through.
At time of writing this the available versions of Java Development Kit (JDK) are 8, 11 and 12. For our purposes it is usually better to have an older version as the Eclipse development is always behind that of JDK. Start by trying the default JDK defined with apt install
$ sudo apt install default-jre
Eclipse Installer
You can either download the default package of Eclipse via the official homepage, or choose a custom Eclipse version from the package download page. You will get the option to Try the Eclipse Installer YYYY‑MM R, which links to a smaller download package. If you choose this option you will get to an Eclipse Installer app with all packages options. You can also download a legacy version, in which case you will again get the same options for selecting different Eclipse packages.
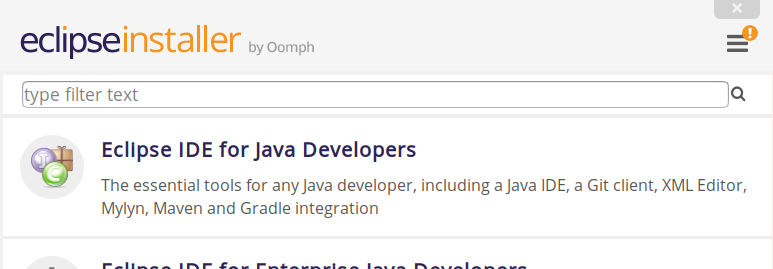
Once dowloaded and installed start the Eclipse Installer. Choose the alternative Eclipse IDE for Java Developers.
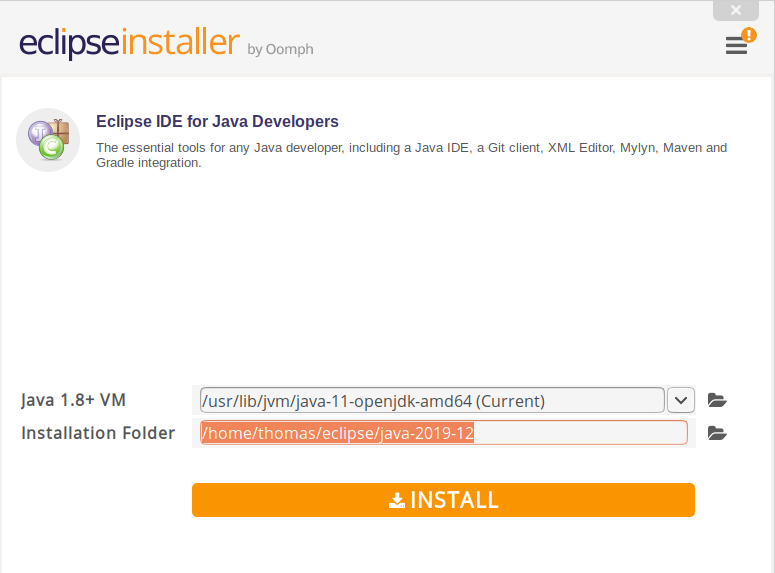
The system should automatically detect your JDK (either by installing it simultaneously or finding the correct version as as in the figure below). If not you have to search for your JDK installation. You also have to set the target directory for your Eclipse installation. Eclipse is completely stand-alone (it does not depend on any other software) and you can have any number of versions installed. Once you have your JDK identified and the installation folder set, click .
More detailed instructions for setting up Eclipse is available on the page How To Install Eclipse Oxygen IDE On Ubuntu 16.04, 17.10, 18.04.
Snap installation
Installing Eclipse with snap is outlined the page How to Install the Latest Eclipse IDE on Ubuntu 18.04. It boils down to the following command:
$ sudo snap install --classic eclipse
Install PyDev IDE
Start Eclipse. Accept, or change, the default working directory and you should reach the Welcome page.
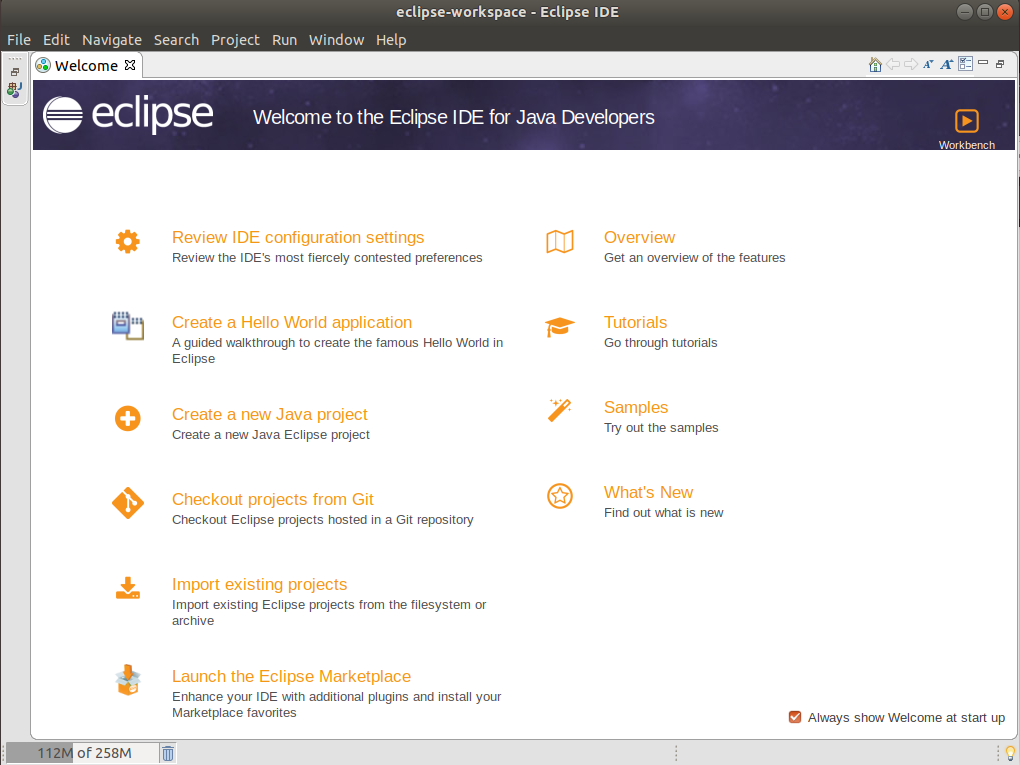
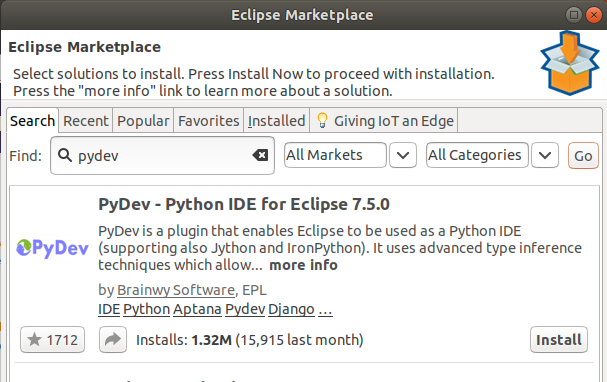
In the welcome page, choose Launch the Eclipse Marketplace (last row in left column in the figure above). Once in the Markeplace type “pydev” in the Find box and hit the button. One of the results, most likely the topmost, should be PyDev - Python IDE for Eclipse X.Y.Z (as in the figure below). Select it, and click
When the installation finishes you will be asked to restart and the next time you start Eclipse your setup will be ready for PyDev coding.
PostgreSQL
PostgreSQL (or postgres for short) is an advanced open source object-relational database system, that can also handle spatial data formats with the extension PostGIS. I use PostgreSQL and PostGIS for handling both processes and data layers when I work with Geo Imagine. My instructions Install postgreSQL and postGIS for Mac OSX are initially not useful for Ubuntu, the installations are completely different.
The following Terminal commands will install PostgreSQL 12 and PostGIS on Ubuntu with some additional bling:
$ sudo apt install postgresql
$ sudo apt install postgresql-contrib
$ sudo apt install postgresql-12-postgis
$ sudo apt install postgresql-12-postgis-scripts
$ sudo apt install postgresql-12-pgrouting
Installing postgres this way creates a default superuser (role in the postgres jargon) called postgres alongside three databases: postgres, template0 and template1. The databases will have the role postgres as owner.
In order to access the database you need to switch over to the role postgres in the Terminal by entering the command:
$ sudo -i -u postgres
If it worked, the prompt will change text and show something like postgres@my-coputer:~$.
You can now access the postgreSQL command line tool psql by simply typing psql:
$ psql
The prompt will change from postgres@my-computer:$ to postgres=#.
Check the roles defined by the \du command:
postgres=# \du
and you should see postgres as a single user.
If the prompt gets stuck, for example showing (END), try quitting by typing the \q command. Even if you do not see the response in the terminal window when typing, try it anyway.
To see which databases are installed in postgres, use the \l command:
postgres=# \l
Create a new role reflecting your machine user
In this section you will set users (roles in the postgres jargon) and passwords. Remember to note these roles and passwords, and then the next section outlines how to store them.
The role postgres does not have any password and the postgres database is thus open to anyone using the postgres role. To simplify your access to your postgres database using psql you could also create a new user identical to your machine login.
To set a password, execute the psql command:
# \password 'yourUser'
You must repeat the password twice. If you want to use standard SQL syntax, you can instead write:
# ALTER USER yourUser WITH PASSWORD 'quoted password';
The basic command for creating a role is:
CREATE ROLE username WITH LOGIN PASSWORD 'quoted password' [OPTIONS]
where username is the user you want to create, and the password is given with quotes. If you look at the list of users (in the Terminal, after you executed the command # \du), the attributes listed in the central column are typical [OPTIONS]. If you create a role, but give no options, the new role (user) can only read the database, neither create, nor alter nor add anything. Such powers must be explicitly stated as [OPTIONS]. The PostgreSQL documentation contains extensive information on how to use psql. And the page How To Install and Use PostgreSQL on Ubuntu 18.04 presents a digestible summary.
When I set up my postgres db cluster, I set a complex password and keep my own user (‘yourUser’). To avoid having to use the command sudo -i -u postgres to login with psql, set ‘yourUser’ identical to you machine login (your standard user). I use the command CREATE USER, that is merely a wrapper to CREATE ROLE, but by default allows the created role(user) to be used for session log in:
# CREATE USER yourUser WITH LOGIN PASSWORD 'quoted password' SUPERUSER CREATEDB CREATEROLE;
Then I create a second, production user (‘prodUser’) that I use when interacting with Postgres from other applications. That is, from Karttur´s GeoImagine Framework:
# CREATE USER prodUser WITH LOGIN PASSWORD 'quoted password' SUPERUSER CREATEDB CREATEROLE;
In this and the following posts I will call the role (user) and password created here ‘prodUser’ and ‘prodPassword’.
After creating the user you should see ‘prodUser’ if you list all users:
#\du
There are so far no tables or schemas in the Postgres db cluster, to check that out you can try the command:
# \dt
psql can be used for creating and managing Postgres databases, but you are instead going to install a Graphical User Interface (GUI), and in the next post you will connect Postgres to Python and then use Python for managing the database. Quit psql:
# \q
Change password
If you need to change the password, the command for that is:
# ALTER USER user_name WITH PASSWORD 'quoted new password';
Return to system user
Return to your system user with the command switch user su:
<span class0’terminal>$ su "youruser"</span>
Secure storing of roles passwords
If you are only going to use your Postgres database as localhost (on your own machine), security is less important. But if you want to protect your data you must set some level of security. The solution I use is primarily for macOS and UNIX/Linux systems, and is not very advanced. I use a combination of storing my password in my home directory (~) combined with a simple encryption.
Create a file in your home directory (~) called .netrc that defines your credentials. An earlier post describes how to use the Terminal for creating and editing files in detail. In the Terminal go to your home directory:
$ cd ~
Then start the Terminal text editor pico for editing/creating the file:
$ pico .netrc
Enter the two lines below (but with your role/user and password), one for the default user (which should be ‘psotgres’ if you followed the instructions above), and one for the production user (‘prodUser’) that you just defined. If you only have the default user, enter the same login and password in both lines.
machine localhost0 login yourUser password yourPassword
machine localhost1 login prodUser password prodPassword
Exit pico (ctrl-X) and save the file (click Y when asked to save). You probably have to change the read and write permissions for .netrc, which you do by executing the following Terminal command:
$ chmod og-rw .netrc
With this solution your credentials will only be explicitly written out in a hidden file and you can always have a look in the file .netrc if you forget your user(s) and password(s).
Postgres GUI
Handling the PostgreSQL database using the Terminal will become tedious when it grows. The alternative is to install and use a Graphical User Interface (GUI). My instructions on Install postgreSQL for mac lists three different GUIs. When originally writing this post (August 2019) only pgAdmin was available for Linux. But since then an early version of TablePlus has also become available. TablePlus is much easier to install.
TablePlus
At time of writing this (March 2020) TablePlus is available in an alpha version for linux (ubuntu). The commands below are directly from the TablePlus instructions.
Add TablePlus gpg key
$ wget -O - -q http://deb.tableplus.com/apt.tableplus.com.gpg.key | sudo apt-key add -
Add TablePlus repo
$ sudo add-apt-repository "deb [arch=amd64] https://deb.tableplus.com/debian tableplus main"
Install
$ sudo apt update sudo apt install tableplus
Then run a general update for your system, that will also affect the TablePlus installation:
$ sudo apt update && sudo apt upgrade
pgAdmin
I did not try to install pgAdmin for postgres 12 under Ubuntu 20.04. My post on how to set up Karttur’s GeoImagine Framework for Ubuntu 18.04, however, contains the instructions for how to setup pgAdmin under Ubuntu.
Part III: Editing and publishing apps
Atom
Atom is a free and open-source text and source code editor with support for plug-ins. It is very versatile and extensible and I use it for keeping track of the documentation related to Karttur’s GeoImagine Framework.
The page How to Install Atom Text Editor on Ubuntu 20.04 outlins different ways to install Atom on Ubuntu 20.04.
The easiest way to install Atom is to use snap:
$ sudo snap install atom –classic
Jekyll
Jekyll is a simple, extendable and static web-site generator, and the solution I use for publishing my blogs and other information related to e.g. Karttur’s GeoImagine Framework. My Jekyll pages are mainly based on the theme So Simple, with some added functions described in my Setup Jekyll Theme Blog.
Jekyll is built on Ruby, but Ruby is also used for many machine system tasks. To setup Jekyll you need to create a Ruby solution set apart from the machine core system and then build Jekyll on that.
My Mac osx installation of Jekyll was based on the mac osx specific package manager Homebrew and Ruby Version Manager (RVM). For Ubuntu it turned out to be a bit more complicated to install the required Ruby “gems” separated from the system and then get Jekyll to work with these gems.
For this installation (Ubuntu) I started out by following the Jekyll official installation instructions, but that did not lead to a functional environment. I thus complemented with the hints given by SvennD on gem: Command not found. Alternatively you can follow the more comprehensive post How to Install Jekyll on Ubuntu 18.04. Here is the sequence of terminal commands that worked for me.
Start with installing ruby and ruby-dev:
$ sudo apt-get install ruby ruby-dev
Then you have to add the following lines to the hidden system file ~/.bashrc.
# Install Ruby Gems to ~/gems
export GEM_HOME="$HOME/gems"
export PATH="$HOME/gems/bin:$PATH"
You can do that by using the terminal editor pico
$ sudo pico .bashrc,
and then add the lines manually followed by save and exit ([ctrl]+[x] keys pressed simultaneously).
Or use the terminal command echo to send the lines to the end of .bashrc:
echo '# Install Ruby Gems to ~/gems' » ~/.bashrc
echo 'export GEM_HOME="$HOME/gems"' » ~/.bashrc
echo 'export PATH="$HOME/gems/bin:$PATH"' » ~/.bashrc
Once you have edited .bashrc, source it to make the changes take effect:
$ source ~/.bashrc
Your system should now be ready to receive the Ruby “gems” and put them in the /gems/ folder under your user (separated from any system folder).
$ gem install bundler
$ gem install jekyll
Your Jekyll installation should now work.
Create site and start Jekyll
Create a new site from the terminal using Jekyll by typing:
$ jekyll new "new-site-name"
To get to the new site you have to change directory (cd) to it in the terminal:
$ cd "new-site-name"
Jekyll’s built-in lightweight web server will serve content on port 4000. If you have firewall service enabled, allow access to this port:
$ sudo ufw allow 4000
Then start the Jekyll server:
$ bundle exec jekyll serve
With this command, Jekyll takes the setup files and the markdown files it can find, and generates the entire blog, including all blogposts. At the same time Jekyll creates a local server on your computer allowing you to browse the blog. The local url of your blog is written at the prompt (default is http://127.0.0.1:4000/). Copy the url and paste it into your web-browser.
From this point my blog/post on Set up blog tools: Jekyll and Atom details how to use Jekyll. My blog on Setup Jekyll Theme Blog contains a dozen posts on how to use and customise Jekyll themes, add more bling and process images and videos for publication.
Git
To setup git just open a terminal and execute the command:
$ sudo apt install git
My instructions on setting up SPIDE for Ubuntu 18.04 has a lengthy section on how to get GitHub desktop to work un Ubuntu 18.04.
How to actually use git is covered in my blog on git command line.
Part IV: Media tools
ImageMagick
ImageMagick is a command-line (Terminal) tool for creating, editing, composing, and converting images. The ImageMagic site lists other options than the command-line for accessing the image manipulation functions. This post only covers installing ImageMagick in Ubuntu. Using ImageMagick is covered in several other of my blogs, starting with this post.
For Ubuntu 20.04 you can install ImageMagick with sudo apt:
$ sudo apt install imagemagick
FFmpeg
FFmpeg is a Terminal command-line driven “cross-platform solution to record, convert and stream audio and video”.
The installation uses the default apt install and is elaborated on, for instance, the page How to Install and Use FFmpeg on Ubuntu 18.04. It only requires three steps:
- Update $ sudo apt update
- Install $ sudo apt install ffmpeg
- Check $ ffmpeg -version
My blog on Setup Jekyll Theme Blog contains several posts on how to use FFmpeg, including for time-series animations of satellite images.