
Contents - Postgres database - Source distributions for macOS - Install PostgreSQL using Homebrew - Install PostGIS using Homebrew - psql - check users and databases - PostgreSQL configuration - Set password and set up roles - Install Graphical User Interface - Postico - pgAdmin - Setting up your production database - Homebrew postgres load agent - Resources
Postgres database
PostgreSQL (or postgres for short) is an advanced open source object-relational database system, that can also handle spatial data formats with the extension PostGIS. I use PostgreSQL and PostGIS for handling both processes and data layers when I work with GeoImagine.
Source distributions for Mac OSX
There are (at least) three alternatives for installing PostgreSQL and PostGIS on your local Mac OSX machine:
- PostgreSQL - the official distribution
- Homebrew - using a mac OS app manager
- KyngChaos - binary installer maintained by William Kyngesburye
Important is that you can not have two versions of PostgreSQL running at the same time at the same port on your computer. If you want to upgrade or change version you have to do a migration. What is possible, however, is to install PostgreSQL from any of the above sources, and then either set different ports, or delete the complete installation and try another. But once you have started filling you database you need to do a migration if you want to keep the data, not just delete and install a new version.
After having tried all options above, I used the Homebrew alternative for installing and setting up PostgreSQL and PostGIS on my macOS. The Homebrew version is up to date, and more easy to do and understand compared to the other alternatives. The KyngChaos binary was not the latest version when I visited the site (2017-12-30). The official distribution requires altering the computer memory capacity. This is not difficult, and I use the official distribution for setting up PostgreSQL and PostGIS on my Linux machines. But for macOS I prefer Homebrew.
Install PostgreSQL using Homebrew
If you do not have Homebrew installed, follow this post or go the Homebrew offical homepage and just copy and paste the installation command in a Terminal window.
To install PostgreSQL using Homebrew, start a Terminal session. Then update your Homebrew library by executing the Terminal command:
$ brew update
When Homebrew is updated with all the latest ‘bottles’, just execute the command:
$ brew install postgres
Homebrew will first install PostgresQLS’s dependencies, and then install the latest version of PostgreSQL.
Errors
Incompatibilities between different versions of postgres itself, and between postgres and different dependencies can cause problems. All major updates most be threaded with care. I have had recurring problems with openssl versions.
Repeating the installation in January 2020, I managed to fix the installation, but this solution is now OBSOLETE. brew no longer allow installation using an url. And with a fresh installation Postgres 13 is compatibile wth openssl1.1 and the installation should proceed without the above tweaks.
If you really need openssl1.1, the post on [postgres error reinstall]((https://karttur.github.io/setup-ide/blog/postgres-error-reinstall/) outlines how to get it.
Here is the error you get if your postgres installation requires openssl1.0 but is not avaiable:
dyld: Library not loaded: /usr/local/opt/openssl/lib/libssl.1.0.0.dylib
  Referenced from: /usr/local/lib/libpq.5.dylib
  Reason: image not found
Warning: The post-install step did not complete successfully
Reading about this particular error online, I first uninstalled postgres:
$ brew uninstall —-ignore-dependencies postgres
followed by
brew update && brew upgrade
brew uninstall openssl; brew uninstall openssl; brew install https://github.com/tebelorg/Tump/releases/download/v1.0.0/openssl.rb
In my versions, the latter command gives some error messages because openssl 1.0.0 is outdated compared to already installed version (1.1.1). But reinstalling postgreSQL with brew
$ brew install postgres
proceeded without warnings.
As mentioned above, the above route for installing openss1.0 no longer works, if you really need openssl1.0 instead try the commands:
$ brew install rbenv/tap/openssl@1.0
followed by
$ brew reinstall openssl@1.0
Completing the PostgreSQL setup
The tasks performed by Homebrew are reported in the Terminal window. And when the installation finishes, Homebrew will tell you that you have two options:
To have launchd start postgresql now and restart at login:
  brew services start postgresql
Or, if you don't want/need a background service you can just run:
  pg_ctl -D /usr/local/var/postgres start
==> Summary
🍺  /usr/local/Cellar/postgresql/10.1: 3,372 files, 38.8MB
Before trying any of the above commands, check if Homebrew started the Postgres server by stopping it:
$ pg_ctl -D /usr/local/var/postgres stop -s -m fast
Then look at the installation message again. What it says is that if you write the command:
$ brew services start postgresql
Homebrew will create a launch agent that starts Postgres server every time you log in to your computer. If you do not want that, but want to start Postgres server manually, you should instead write:
$ pg_ctl -D /usr/local/var/postgres start
I use Postgres so frequently that I prefer it to start every time I log in. If you have trouble with the launch agent, look at the last section of this post.
Check that Postgres server is running, and which version you installed by executing the command:
$ postgres -V
If the Terminal returned something like:
postgres (PostgreSQL) 10.1
Postgres server is up and running.
Install PostGIS using Homebrew
If your Postgres server is running, stop it:
$ pg_ctl -D /usr/local/var/postgres stop -s -m fast
Then install postGIS, at the Terminal write:
$ brew install postgis
As when you installed PostgreSQL, the progress of the installation will be reported in the Terminal window. In my case the installation reports quite a list of caveats.
The Postgres server might start up after the installation finishes, try the command:
$ postgres -V
If the Terminal returns something like:
postgres (PostgreSQL) 10.1
Postgres server is running. Otherwise start the server:
$ pg_ctl -D /usr/local/var/postgres start
Test if everything is OK, by entering the following command at the Terminal (note that the path given /usr/local/var/ is the path to the folder where Homebrew installs Postgres):
$ export PGDATA=’/usr/local/var/postgres’
followed by:
$ pg_ctl status
If everything is OK so far, the Terminal should return a PID:
pg_ctl: server is running (PID: xxxxx)
psql - check users and databases
Postgres comes with a built-in Terminal access that allows you to carry out administrative functions without needing to know their actual SQL commands, psql. Start psql by typing at the Terminal prompt:
$ psql postgres
If you are denied starting psql, try:
$ sudo psql postgres
If this does not work either, you have to create the database cluster ‘postgres’ before continuing.
$ initdb /usr/local/var/postgres.
Then retry starting psql.
When psql is active, the last line in the Terminal window changes and now indicates the database (‘postgres’=#), and the psql command line prompt (#):
postgres=#
Use the psql command line to query PostgreSQL for which users are installed:
# \du
The Terminal window should return a single role - in PostgreSQL terminology ‘user’ is called ‘role’. By default Homebrew adds the system logged in user (‘yourUser’) that installed PostgreSQL as a ‘SuperUser’. You should also see the attributes connected to ‘yourUser’, and which groups you are a member of (none at start).
List the the databases that Homebrew installed, by typing the command:
# \l
The Terminal window returns the installed databases; there should be three: postgres, template0 and template1. Your role (user) should be the owner of all of them.
Quit psql by typing
# \q
When you hit return you will get back to the ordinary command line prompt $.
PostgreSQL configuration
Start by creating a new database (db), that will be used for verifying the installation. You can delete (DROP) it later:
$ createdb mytest
Enable the created db by accessing it using psql:
$ psql mytest
The Terminal should change to:
mytest=#
To extend mytest with PostGIS, write the command:
mytest=# CREATE EXTENSION postgis;
If it worked, the Terminal window should return:
mytest=# CREATE EXTENSION
To see the version of PostGIS, execute:
mytest=# SELECT PostGIS_Version();
You should get some information on your PostGIS installation,
If you want to delete ‘mytest’, exit psql:
# \q
And then write:
$ dropdb mytest
Set password and set up roles
In this section you will set users (roles in the postgres jargon) and passwords. Remember to note these roles and passwords, and then the next section outlines how to store them.
Other posts following this, build on the assumption that the db cluster ‘postgres’ is your production db, and that you have two (2) users: the default user (‘yourUser’), and a production user (‘prodUser’). There is no problem in doing it in other ways, following the suggestions might just make it easier to remember.
Assuming that you are going to use the db cluster ‘postgres’ for you production, start psql for the ‘postgres’ db cluster at the Terminal prompt:
$ psql postgres
The default user added by Homebrew (‘yourUser’) does not have a password, to set a password, execute the psql command:
# \password 'yourUser'
You must repeat the password twice. If you want to use standard SQL syntax, you can instead write:
# ALTER USER yourUser WITH PASSWORD 'quoted password';
The basic psql command for creating a role is
CREATE ROLE username WITH LOGIN PASSWORD 'quoted password' [OPTIONS]
where username is the user you want to create, and the password is given with quotes. If you look at the list of users (in the Terminal, after you executed the command # \du), the attributes listed in the central column are typical [OPTIONS]. If you create a role, but give no options, the new role (user) can only read the database, neither create, nor alter nor add anything. Such powers must be explicitly stated as [OPTIONS]. The PostgreSQL documentation contains extensive information on how to use psql, and this page at www.codementor.oi presents a more digestible summary.
When I set up my postgres db cluster, I set a complex password and keep my own user (‘yourUser’). Then I create a second production user (‘prodUser’) that I use when interacting with Postgres from other applications. I use the psql command CREATE USER, that is merely a wrapper to CREATE ROLE, but by default allows the created role(user) to be used for session log in:
# CREATE USER prodUser WITH LOGIN PASSWORD 'quoted password' SUPERUSER CREATEDB CREATEROLE;
In this and the following posts I will call the role (user) and password created here ‘prodUser’ and ‘prodPassword’.
After creating the user you should see ‘prodUser’ if you list all users:
#\du
There are so far no tables or schemas in the Postgres db cluster, to check that out you can try the command:
# \dt
psql can be used for creating and managing Postgres databases, but you are instead going to install a Graphical User Interface (GUI), and in the next post you will connect Postgres to Python and then use Python for managing the database. Quit psql:
# \q
Secure storing of roles passwords
If you are only going to use your Postgres database as localhost (on your own machine), security is less important. But if you want to protect your data you must set some level of security. The solution I use is primarily for macOS and UNIX/Linux systems, and is not very advanced. I use a combination of storing my password in my home directory (~) combined with a simple encryption.
Create a file in your home directory (~) called .netrc that defines your credentials. An earlier post describes how to use the Terminal for creating and editing files in detail. In the Terminal go to your home directory:
$ cd ~
Then start the Terminal text editor pico for editing/creating the file:
$ pico .netrc
Enter the two lines below (but with your role/user and password), one for the default user (if you installed Postgres with Homebrew the default user is the same as your user on the local machine - ‘yourUser’), and one for the production user (‘prodUser’) if you followed my suggestions in the previous post. If you only have the default user, enter the same login and password in both lines.
machine localhost0   login yourUser   password yourPassword
machine localhost1   login prodUser   password prodPassword
Exit pico (ctrl-X) and save the file (click Y when asked to save). You probably have to change the read and write permissions for .netrc, which you do by executing the following Terminal command:
$ chmod og-rw .netrc
With this solution your credentials will only be explicitly written out in a hidden file.
Install Graphical User Interface
Handling the PostgreSQL database using psql will become tedious when it grows. Instead you should download a Graphical User Interface (GUI). The primary free alternatives are pgAdmin, the light version of Postico and TablePlus. pgAdmin is more comprehensive compared to the (never expiring) trial version of Postico, but Postico feels more modern. Getting tired of both these alternative since I wrote the original post in December 2017, I have switched to using TablePlus.
Postico
If downloading Postico it comes as a .zip file. Just double click to open and drag the Postico.app to the /Applications folder.
Start Postico.
In the window that opens, fill in Nickname, User: ‘prodUser’, Password: ‘prodPassword’. Host: localhost, and Port: 5432, are already set. Click , and you are able to explore your postgreSQL db. As I am not used to Postico, I will instead use pgAdmin to explore the db.
pgAdmin
pgAdmin is downloaded as a diskimange .dmg. Just double click, agree to the licence, and when the diskimage opens, just drag the pgAdmin to the /Applications folder.
Start pgAdmin.
In the window that opens, look for the tab Quick links and the text/icon ‘Add New Server’, and click the latter. In the Create server window that opens, select the General tab (should be the default), add a Name of your choice, set Server Groups to Servers, add any Comment (or leave blank). Change to the Connections tab, and fill in: Host name/address: localhost, Port: 5432, Maintenance database: postgres, Username: ‘prodUser’, Password: ‘prodPassword’. You can leave Role blank or set it to ‘prodUser’.
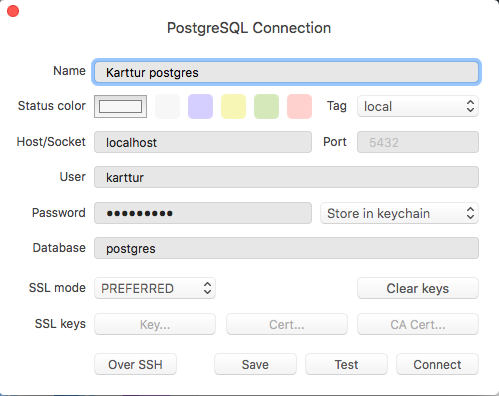
TablePlus
TablePlus is downloaded as a diskimange .dmg. Just double click and when the diskimage opens, just drag the TablePlus to the /Applications folder. Connect TablePlus to PostgreSQL as shown in figure 1.
Setting up your production database
Assuming that your ‘postgres’ database cluster is your production environment, make sure it is the selected db (whether in the Terminal, Postico, pgAdmin or TablePlus). And execute the following SQL command:
CREATE EXTENSION postgis;
CREATE EXTENSION postgis_topology;
You should get the response:
CREATE EXTENSION
CREATE EXTENSION
regardless of your environment.
Homebrew postgres load agent
This section is just if you have problems, and want to, automatically start postgres server at system log in.
Getting a homebrew installed postgres server to start every time you log in to your macOS can be tricky. If you need to manage the automatic service, here is a short introduction.
In macOS the services that start at login are given in .plist (short for ‘property list’) files. These .plist launchagents are usually either stored in ~/Library/LaunchAgents or /Library/LaunchAgents. If Homebrew created a launch agent for postgres server, it will be under your home directory, and you can check if it is exists using the Terminal:
$ ls ~/Library/LaunchAgents
If the Terminal window returns No such file or directory you do not have any user specific launch agents (just read on, it will be solved further down).
If the Terminal window instead returns a list of files, and the list includes a file called homebrew.mxcl.postgresql.plist (or similar) you have a launch agent for postgres.
If you do not have a postgres associated .plist, but want Postgres server to start at login, you can copy the Postgres internal .plist file. The Homebrew installed Postgres .plist file should be under the path:
/usr/local/Cellar/postgresql/’version’/
In my system that translates to:
/usr/local/Cellar/postgresql/10.1/
Thus I can find my Postgres .plist file by writing at the Terminal:
ls /usr/local/Cellar/postgresql/10.1/
And I see that I have the .plist file homebrew.mxcl.postgresql.plist.
If your home directory did not have a launchagents directory (~/Library/LaunchAgents), create that directory using the Terminal:
mkdir -p ~/Library/LaunchAgents
Then use the Terminal to copy the Postgres .plist you found under /usr/local/Cellar/postgresql to ~/Library/LaunchAgents
cp /usr/local/Cellar/postgresql/10.1/homebrew.mxcl.postgresql.plist ~/Library/LaunchAgents/
For macOS to actually load a launch agent, you must load it to launchctl:
launchctl load ~/Library/LaunchAgents/homebrew.mxcl.postgresql.plist
And if you want to remove (unload) a .plist file from launchctl:
launchctl unload ~/Library/LaunchAgents/homebrew.mxcl.postgresql.plist
Resources
Getting Started with PostgreSQL on Mac OSX, at www.codemaster.io.
How to install PostGIS on Mac OS X, at morphocode.com
Installing postgresql and pgAdmin, by John Plummer