Contents - introduction - Installation - Basic ImageMagick commands - Change image format and quality - Keeping the image format and name - Crop image - Shave - Set border - Resize - More functions - Batch processing - Combined commands - Terminal Batch processing - Resources
introduction
ImageMagick is a command-line (Terminal) tool for creating, editing, composing, and converting images. The ImageMagic site lists other options than the command-line for accessing the image manipulation functions. In this blog I will only briefly introduce ImageMagick for macOS. The official homepage, as well as many other blogs, have excellent tutorials and cheatsheets for how to use ImageMagick.
This post focuses on using ImageMagick for batch processing, and describes how I use ImageMagick for editing the maps at the top of Karttur´s GitHib pages.
Installation
I use Homebrew, for installing ImageMagick, but you can also go to ImageMagick Download page and follow the installation instructions. Homebrew is package manager for macOS (other alternatives include MacPorts and Fink, but I prefer Homebrew). If you want to use Homebrew, please visit the Homebrew site and install Homebrew.
Start a Terminal session, and update Homebrew before installing any app to make sure you get the latest version.
$ brew update
Then install ImageMagick from the Terminal command-line:
$ brew install imagemagick
With older versions of Brew you had to add vector processing for ImageMagick with the command: $ brew install imagemagick –with-librsvg. But this was changed and is no longer required (or even possible).
If you need to remove a Homebrew installed app, use the command remove:
$ brew remove imagemagick
Then reinstall the newer version, or install with added commands if requested.
Basic ImageMagick commands
Start a Terminal session, and go to the directory where you have the images you want to work with.
$ cd /path/to/your/imagefolder
You can also just write $ cd at the command-line and drag the path from a Finder window.
Make a new director (mkdir), it will be created as a sub-directory under the present Terminal directory:
$ mkdir pub-images
The syntax in the examples below produces images that are saved in a subfolder pub-images. If the sub-folder does not exists the ImageMagick functions will not work.
Important note on file and folder names
The Terminal command-line interprets all blanks as separators. Thus, if your folder name contains blanks (e.g. my folder) or your file name contains blanks (how to tame a lion.jpg), the Terminal will not be able to interpret the “commands” my, folder, how, to, tame (lion.jpg might be understood as an image, but one that does not exist). To avoid this you must quote folders and files that contain blanks. The the Terminal thus correctly interprets "my folder" and "how to tame a lion.jpg".
Change image format and quality
The basic command for executing ImageMagick is $ convert. All image manipulations require some parameters, except for changing the image format. For changing the image format you only need to state the the source image SrcImage and the destination file where to save the new image, DstImage. To change the file type, simply give the desired file type extension in the DstImage. If you want to change from, say png to jpg, the command to write in the Terminal is simply:
$ convert SrcImage.png pub-images/DstImage.jpg
As the map images I use at the top of each page are rather large, I wanted to reduce the file size (without changing image dimensions), which I can do using the quality function. All the maps at the top of Karttur´s pages are jpg files, with quality set to approximately 70 %:
$ convert -quality 70 SrcImage.png pub-images/DstImage.jpg
Keeping the image format and name
If you want to keep the name of your image after ImageMagick manipulations, you can use $ mogrify instead of $ convert, but you have to give the -path while skipping the DstImage parameter:
$ mogrify -path pub-images/ SrcImage.ext
If you do not add any other ImageMagick function, $ mogrify will simply create a copy of SrcImage.ext (where ext is the file format extension). You can always use $ mogrify instead of $ convert, but below I will use $ convert.
Set border and colors
If you want to have a border on your images, you have to give two ImageMagick parameters -border and -bordercolor:
$ convert -border sidewidthxtopbottomwidth -bordercolor "HEXcode" SrcImage.ext pub-images/DstImage.ext
where sidewidth is the border width at the sides, topbottomwidth the width at the top and bottom, and quoted HEXcode the color code. HEX-code is a standardized hexadecimal system for setting colors as “#RRGGBB”. The w3schools.com site gives a short introduction to HEX colors, including a tool for color picking. (w3schools.com is also a generally useful resource for learning html and how to build web-pages). To set a black border width of 2 pixels on all sides, give HEX code = "#000000", interpreted as no [00] red, no [00] green and no [00] blue, and then the ImageMagick command for setting the borders (png file type):
$ convert -border 2x2 -bordercolor "#000000" SrcImage.png pub-images/DstImage.png
ImageMagick also understands the html accepted standard color names, also listed on the w3schools.com site. Instead of "#000000" you can simply use (unquoted) -bordercolor black. If you want to use transparency, you can instead give colors as quouted “RGBA(R,G,B,A)”, with the colors (RGB) ranging for 0 to 255, and alpha (A) set as a decimal between 0 (completely transparent) and 1 (completely opaque).
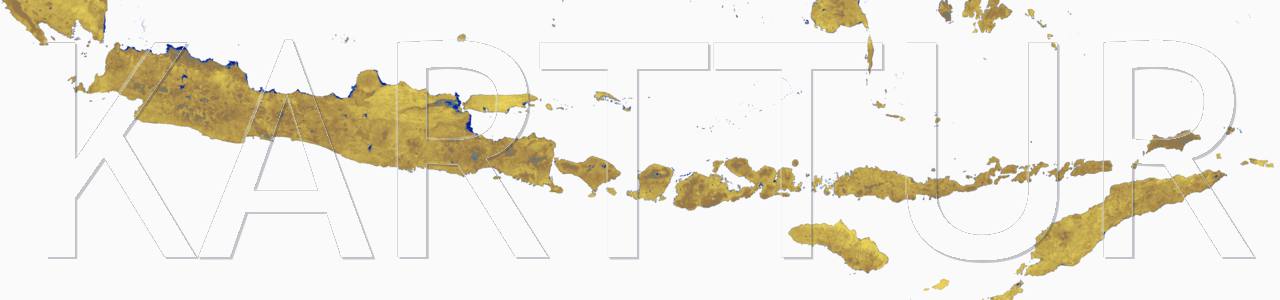
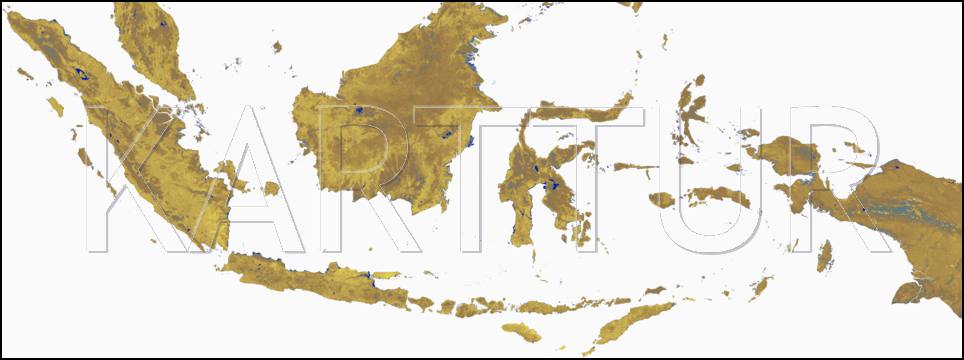
The image below shows a map of Indonesia produced by karttur´s Geo Imagine Framework, with a black frame of 2x2 pixels.
Crop image
The -crop function cuts out a rectangular region. I use -crop to cut out maps to fit the width of my blogs, and to have a wide landscape perspective.
$ convert [+repage] -crop wxh+startx+starty +repage SrcImage.ext pub-images/DstImage.ext
where w = the width of the DstImage, h = the height, startx the column in the SrcImage to become the left edge in the DstImage, starty the row to become the top edge, and ext is the filetype of SrcImage and DstImage. +repage is a special parameters that checks image and canvas areas. It is not always required (denoted by the square parenthesis, []), only some ImageMagick functions require it, and then it depends both on the image type, and how it was created. If the DstImage seems to be shifted or does not look proper, add +repage and try again. The ImageMagick manual tells which functions need the +repage parameter and under what circumstances.
The example below cuts a png image (a large map) to have the dimensions I use for maps at the top of Karttur´s GitHub pages.
$ convert -crop 1280x300+10+10 SrcImage.png pub-images/DstImage.jpg
DstImage will get a size (in pixels) of 1280 columns and 300 rows, starting at column 10 and row 10 in SrcImage. The SrcImage image is a png and the result, DstImage, will be a jpg image (with no compression, as the -quality is not stated).
Shave
If the edges of your image contain whitespace or an old frame that you want to remove, you can use -shave instead of -crop to cut out the central part of an image:
$ convert -shave shavesidesxshavetopbottom SrcImage.ext pub-images/DstImage.ext
where shavesides is the width (in pixels) that you want to shave away along the sides, and shavetopbottom the shaving at the top and bottom. The example below shaves 5 pixels at each side, and 10 pixels at the top and bottom (jpg file type):
$ convert -shave 5x10 SrcImage.jpg pub-images/DstImage.jpg
Another options is to use -trim that removes edges that are the same color as the corner pixels. If you combine -trim with the function -fuzz, ImageMagick also removes pixels of nearly the same color (with ‘nearness’ defined either in absolute or relative terms) as the corners. -fuzz can be used together with several other ImageMagick functions, as explained in the online manual.
Resize
With the ImageMagick -resize function, you can change the dimensions of an image.
$ convert -resize wxh +repage SrcImage.png pub-images/DstImage.png
where w is the DstImage width and h the height.
The image will be proportionally enlarged or reduced to fit the given size. If the given size is not proportional to the SrcImage, the DstImage will adopt to the smallest proportional size as default. To force the -size to w and h even if not proportional to the SrcImage, add an exclamation mark (“!”) after the -size parameter:
$ convert -resize wxh! +repage SrcImage.png pub-images/DstImage.png
In my case (the maps at the top of each page), I wanted the maps to have the same width (1280 pixels), and then I only give the width value:
$ convert -resize 1280x SrcImage.png pub-images/DstImage.png
To only -resize images larger or smaller than a specific width or height, ImageMagick accept the signs > and <, but then you have to quote the -resize parameter. To -resize only images larger than 1280 pixels in width:
$ convert -resize "1280>x" SrcImage.ext pub-images/DstImage.ext
Images smaller than 1280 pixels will keep their original size, and DstImage will become an exact copy of SrcImage.
You can also apply filters for the -resize command, as explained in the ImageMagick manual.
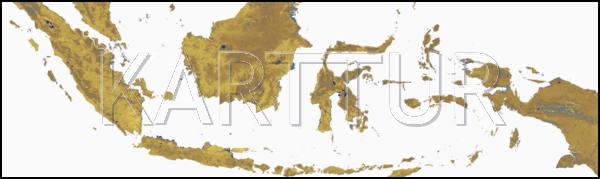
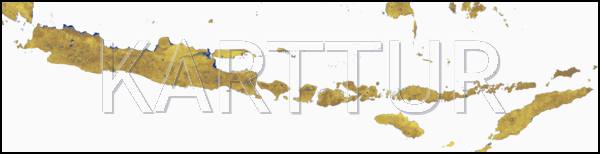
The images below are cropped and resized versions of the Indonesian map above. The command for creating the -resize and -crop of Java is:
convert -resize 1200x -gravity south -crop 596x150-50+5 -border 2x2 -bordercolor black SrcImage.tif -quality 72 pub-images/DstImage.jpg
How to create the embossed watermark with the text “KARTTUR” is covered in another post
More functions
ImageMagick has thousands of functions for image manipulations. Once you learn the basics, you will quickly learn to find and use more functions.
Batch processing
As I process a lot of images, both for my scientific work, and for my web.pages, I can not write individual ImageMagick commands for each function and each image. I use two shortcuts, combined commands, and looping over sets of images.
Combined commands
You can combine ImageMagick functions in a single command, but you must keep the order of functions correct. If you want to have a border, and also change from a png to a jpg image file, with a reduced quality, then you combine the commands like this:
$ convert -border 1x1 -bordercolor black -quality 80 SrcImage.png pub-images/DstImage.jpg
You can expand the command with as many functions you need to create the desired DstImage. You can even nest commands for different images within a single command-line, as explained in the another post
Terminal Batch processing
You can use the Terminal to set up batch processing, either for single or combined commands. You can then process a whole folder full of images in one go:
$ for i in *.png; do convert -shave 5x15 +repage -border 2x2 -bordercolor black -resize 1280x -quality 80 "$i" "pub-images/${i%.*}.jpg"; done
In the Terminal command line semi-colon “;” denotes a new command-line function. To write a command over several lines, you instead glue the command at the end of each line with a backslash (\). Disentangling and commenting (“#”) the code above, it can be interpreted as:
for i in *.png # Get all files of type png in the present folder and loop while labelling each image i in the loop
    do #starts the loop of the ImageMagick combined functions
    convert -shave 5x15 +repage -border 2x2 -bordercolor "#000000" -resize 1280x -quality 80
    "$i" # is interpreted as the text of the parameter "i" = the filename
    done # ends the loop
Resources
Cross platform ImageMagick introduction by Brian Linkletter.