Contents - Introduction - Options for setting text - Annotate - Font size and dpi - Position anchor (-gravity) - Font color - Font type - Draw - Embossing watermark - Caption - Resources
Introduction
This post is about putting a caption, label, watermark or other text directly in an image for web publishing. I also wanted to create animations from time-series of maps, and put both a caption, a time line and a clock in the image. This can not be done manually, and I chose to use ImageMagick. This post only covers how to use ImageImagick for putting text in images, and to create image compositions. The previous post is an introduction to ImageMagick.
Images canvas and layer(s)
If ImageMagick does not put the text as you expected (or not text at all), the chance is that your layer is not filling up the canvas. A canvas can contain more than one layer, and the positions you are setting the text at might be in the canvas but outside the layer. If this happens, try to use the option +repage, and ImageMagick adjusts the canvas to fit the layer.
Options for setting text
The ImageMagick functions -annotate, -draw, -caption and -label can all be used for writing text to images. Which function to use depends on how much and what type of control you want to have over the text that is written. The general options for setting fonts, colors and postions are similar. The blog uses -annotate as the vehicle for explaining how to put text in images, and then I describe how I used -draw to put the embossed watermark text on the maps at the top of each page, and -caption label -label for setting text in pre-defined geometries.
Annotate
The basic command-line syntax to -annotate an image using ImageMagick is:
$ convert -annotate +startx+starty "annotation" SrcImage.ext DstImage.ext

where startx is the image column where the text should start, starty is the row where to start, and the quoted text that follows (annotation) is the text to write; SrcImage and DstImage are the source and destination images, with ext denoting the image file type. If you want to write “My map” in the upper left corner (20 pixels from the left and 30 pixels from the top) on a png file, this then becomes:
$ convert -annotate +20+30 "My map" SrcImage.png DstImage.png
Font size and dpi
To define the font size, add the function -pointsize before -annotation:
$ convert -pointsize points -annotate +startx+starty "annotation" SrcImage.ext DstImage.ext
where the parameter points is the font size in dots per inch (dpi). How big your fonts are going to become then depends on the dpi that your image is set to. You can set, or change, that using ImageMagick. dpi does not really matter for the internet, as modern web-browser ignore the dpi setting, but traditionally web images have been set to 72 dpi. For printing the most common is usually 300 or 600 dpi (or somewhere in between).
You can use ImageMagick to query the image metadata (data about the image):
$ magick identify SrcImage.ext
which will return the most basic metadata, but not the dpi. You can add different parameters to extend the returned metadata, as described in the ImageMagick manual. One option is the parameters -format, and to get the image size and resolution (dpi) execute the Terminal command:
$ magick identify -format "%w x %h %x x %y" SrcImage.ext
You then get the width and height (in pixels) and the horizontal and vertical dpi. If you want to change the dpi, use the ImageMagick function -units, with either the parameter -density or -resample. The latter has more advanced options available - see the ImageMagick manual. To keep the image size, use -density :
$ convert -units PixelsPerInch SrcImage.ext -density dpi DstImage.ext
where dpi is the dpi you want the DstImage to have. Do not change PixelsPerInch, it defines the -units to change. To change a png image to have 72 dpi, the command becomes:
$ convert -units PixelsPerInch SrcImage.png -density 72 DstImage.png
If you try the same font size (expressed as -pointsize) on two copies of the same image, one at 72 dpi and the other at 300, you will get differently sized text on the two images.
$ convert -pointsize 24 -annotate +50+200 "Okavango" SrcImage@72dpi.ext DstImage@72dpi.ext
$ convert -pointsize 24 -annotate +50+200 "Okavango" SrcImage@300dpi.ext DstImage@300dpi.ext
Position anchor (-gravity)
The positions set above uses the upper left image corner as reference. In ImageMagick the reference point is called -gravity, and upper left is the default. If the text should be in the lower right corner, instead of calculating the image rows and columns from the upper left corner, you can use the lower right corner as the -gravity point, and just give the relative distance from that point. The lower right corner -gravity parameter is SouthEast, for other options see the ImageMagick manual for -gravity.
$ convert -pointsize 30 -gravity SouthEast -annotate +120+100 “my map” SrcImage.ext DstImage.ext
The offset distance is always positive towards the image center.
Font color
To change the font color when using -annotate add the parameter -fill and either the quoted HEX-code, color defined as quoted RGB[A] (“RGB[A](0,0,255[,0.5])”, or standard html name for the color you want the text to have:
$ convert -pointsize 30 -fill "#339966" -annotate +20+30 "My map" SrcImage.ext DstImage.ext
Font type
To set the font of any text to -annotate, there are several [optional] parameters , -font, -family, -stretch, -style, and -weight. ImageMagick can use TrueType fonts (defined in the operating system on your machine), and also other types of fonts. If you stick to the more common fonts this should not be a problem. For setting a font, I will jump straight to an example:
$ convert -font ArialB -family Arial [-stretch Condensed] [-style Italic] [-weight DemiBold] -pointsize 54 -fill "#339966" -annotate +20+30 "My map" SrcImage.ext DstImage.ext
You have to set the -font, -family is a backup. -stretch, -style and -weight only works for some fonts. To check out the internal ImageMagick fonts and how they can be set use the magick -list command:
$ magick -list font
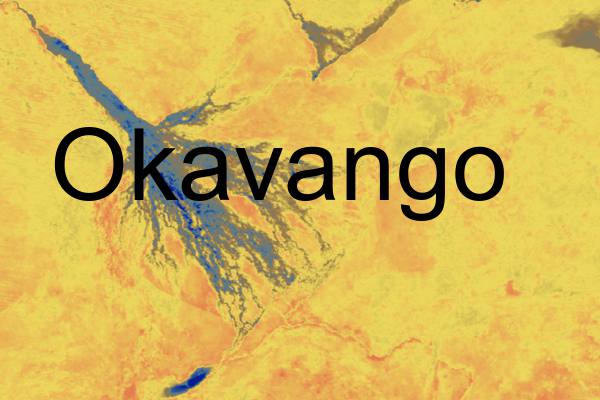
The following ImageMagick command includes two -annotate options, each with a different -font. The first text is rotated 45 degrees. The DstImage is a compressed jpg image, shown to the right.
$ convert SrcImage.png -pointsize 14 -font ArialNarrowI -fill blue -annotate 45x70+38+10 'Panhandle' -pointsize 44 -font Trebuchet -fill 'RGBA(0,0,255,0.5)' -annotate +25+100 'Okavango' -quality 72 DstImage.jpg
Draw
The ImageMagick function -draw is not only for text, but can also be used for drawing geometric primitives. I use -draw for setting the embossed watermark text on the maps at the top of each Karttur page.
You can use draw to create an image just containing text:
$ convert -size 240x180 -background white -pointsize 40 -font Trebuchet -fill silver -gravity center caption:"KARTTUR" DstImage.png

To make a bit more fancy, add a shade (and save as compressed jpg):
$ convert -size 240x180 -background white -pointsize 40 -font Trebuchet -fill silver -gravity center caption:"KARTTUR" -shade 240x40 -quality 72 DstImage.png
To create an image with just the shades, use -draw to redraw the text three times, with different offsets. Below I draw the text “KARTTUR” in transparent white with an offset +2+2, then I redraw in a transparent very dark blue with an offset -2-2, and then I draw in grey with no offset, finally I set grey to -transparent using a -fuzz of 90%.
convert -size 240x180 xc:none -font Trebuchet -pointsize 40 -gravity center -draw "fill 'RGBA(32,32,64,0.25)' text 2,2 'KARTTUR' fill 'RGBA(255,255,255,0.25)' text -2,-2 'KARTTUR' fill grey text 0,0 'KARTTUR' " -transparent grey -fuzz 90% -quality 72 DstIage.jpg

The result is an image with only the shades of the text “KARTTUR”, the text I use to emboss the watermark on the maps.
Embossing watermark
To emboss the text watermark, I take the ImageMagick command, and combine it with the image processing that cuts the maps as described in the previous blog and nest it into a batch command ( cannot get a backslash plus parenthesis to dispaly in any way so you have to replace backslash C “\C” with backslash parenthesis in two places):
$ for i in *.png; do convert \C -shave 5x15 +repage -resize 1280x "$i" \) \C -size 1280x300 xc:none -font Trebuchet -pointsize 300 -gravity center -draw "fill 'RGBA(32,32,64,0.25)' text 2,2 'KARTTUR' fill 'RGBA(255,255,255,0.25)' text -2,-2 'KARTTUR' fill grey text 0,0 'KARTTUR' " -transparent grey -fuzz 90% \) -composite -quality 72 "pub-images/${i%.*}.jpg"; done
The command contains 1 main section, and two sub units, the first for cutting the input image, and the second to create the text image. The two images are then joined using -composite
I got a bit stuck on the above, because I did not keep the required blank spaces around the sub units slash+parenthesis, “\C” and “\)” .
The embossed waterwark text on the image at the top of the page is created with the above command.
Caption
For my animated time-series, the font size depends on the image size and the length of the time-series, and I do not know it beforehand. I needed some way to rather fit text in a predefined space, than to set the font size. The solution is to define a -geometry and then let ImageMagick fit the text you want to appear into that -geometry. Truly Magick for me, as this is exactly what I was looking for. With this solution -pointsize is omitted, but you can still set the other font options outlined above.
$ convert SrcImage.ext -size 200x75 -background none caption:"My map" -geometry +20+30 -composite DstImage.ext
In this function SrcImage is set as the first parameter and then the last function -composite joins the -geometry (of size -size) after the -caption is set in the -geometry. The text is automatically adjusted to fit in the -geometry. To set -background color you give a quoted Hex-code (“#RRGGBB”, for example a red background: “#990000”):
$ convert SrcImage.ext -size 200x75! -background "#990000" caption:"My map" -geometry +20+30 -composite DstImage.ext
The exclamation mark (“!”) forces the size. And with -font, -fill (font color) and -gravity added:
$ convert SrcImage.ext -size 200x75! -background "#990000" -font Verdana -fill "#999900" caption:"My map" -gravity SouthEast -geometry +20+30 -composite DstImage.ext
The above example left adjusts the text in the -geometry. If you want it centered you need to separate the -geometry from the main image. I then also use -label instead of -caption (I could not get backslash \ plus parenthesis “(“ to show up, so the starting parenthesis “(“ is shown as “C”):
$ convert 300dpi.png \C -size 200x75 -background "#990000" label:"my map" -trim -gravity center -extent 200x75 \) -gravity SouthEast -geometry +120+100 -composite DstImage.png
Use -rotate to rotate the text clockwise, inside the separated command for the -geometry (if outside the whole image will be rotated):
$ convert SrcImage.png \C -size 200x75 -background "#990000" label:"My map" -trim -gravity center -extent 200x75 -rotate "-90" \) -gravity SouthEast -geometry +120+100 -composite label.png
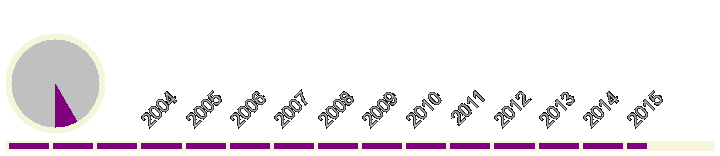
The image below is the timeline and clock that I -composite with image frames to create animations from time series of maps. The text in the image is created using ImageMagick, whereas the time line and clock are created using a Python script.