
Contents - introduction - Install Inkscape - ImageMagick vector processing - Vector overlay - Emboss watermark - Resources
introduction
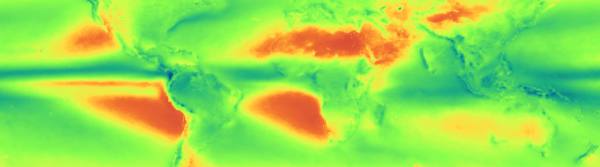
This post assumes that you installed and got acquainted with ImageMagick, introduced in an earlier post and then further elaborated in another post. I use InkScape and ImageMagick for creating vector overlays on image maps, like the global shoreline on the map image at the top of this page. How this is done is explained in this post.
Install Inkscape
Inkscape is an open source vector graphics editor available for all major operating systems. For macOS you can install Inksape either using Homebrew (introduced in this post) or use an installer that first installs XQuartz and then Inkscape. Both alternatives are outlined on the Inkscape site. Here I will only go through the Homebrew installation. To install InkScape using Homebrew, start a Terminal session and type at the command-line:
$ brew install caskformula/caskformula/inkscape
It will take quite some time for Homebrew to install (it took an hour for me). When the installation is ready, start inkscape from the Terminal
$ inkscape
If macOS does not find the command $ inkscape you need to give the full path to the InkScape app, but that depends on your installation. For my Homebrew installation it is:
$ /usr/local/bin/inkscape
But you should not have to worry about that if your InkScape installation completed without errors.

ImageMagick vector processing
The vector files that I use for map layout are produced from a Geographical Information System (GIS), introduced in another blog. Any editing that I need to do is then done in IncScape. If you do not have a vector file, go ahead and draw a vector in InkScape and save it as a .svg file.
Assuming that you have a vector file (.svg) and want to just convert it to an image (rasterize in GIS jargon), the ImageMagick Terminal command is:
$ convert SrcVector.svg DstImage.png
If you want the image to have a specific size, you should be able to use the ImageMagick usual function -resize (the example sets the image size using the width (w), height will be set proportionally):
$ convert -resize wx SrcVector.svg DstImage.png
If this did not work, add the ImageMagick function -density, and instead try:
$ convert -density 72 -resize wx SrcVector.svg DstImage.png
To force a non-proportional image, set both width (w) and height (h) followed by an exclamation mark (“!”):
$ convert -density 72 -resize wxh! SrcVector.svg DstImage.png
If you want to remove the white background (that at least I seem to get when I use .svg files in ImageMagick), set -background to none:
$ convert -background none -density 72 -resize wx SrcVector.svg DstImage.png
You can also use InkScape for converting vector files to images, either from InkScape’s graphical interface, or using the Terminal:
$ inkscape -z -e DstImage.png -w w -h h SrcVector.svg
Vector overlay
ImageMagick can be used for putting a vector on top of an image, that is how I get the global shoreline on top of the rainfall map at the top of this page. The ImageMagic command for combining images, or vectors, is -composite.
$ convert -composite SrcImage.tif SrcVector.svg DstImage.png
On the command-line, the vector (overlay) must be entered after the image to end up on top in DstImage. In the command above the SrcVector is neither transparent, nor is it fitted to the SrcImage, and the result is probably not what you wanted.
To -resize the vector to fit your image (as I want for my maps), find out the dimensions of your image:
$ magick identify SrcImge
Then set the dimensions for width and height using -resize, and force the vector to fit (by adding an exclamation mark). For ImageMagick to understand that the -resize is for the SrcVector you need to separate the vector processing by enclosing it using \C and \) (where the C should be the first parenthesis but I can not get it to show properly in html so I use a C - you must change “C” to “(“ to make it work):
$ convert SrcImage.tif \C -background none -resize wxh! SrcVector.svg \) -composite DstImage.png
You can put the overlay vector anywhere in the SrcImage, resized to any size. For instance by combining -resize, -geometry and gravity as in this post.
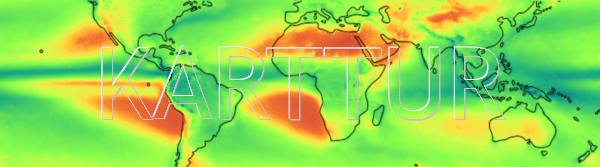
Emboss watermark
The image map at the top of the page also has an embossed watermark. The command for only creating the watermark (as explained in an earlier post) is:
$ convert -size wxh xc:none -font Trebuchet -pointsize 300 -gravity center -draw "fill silver text 1,1 'KARTTUR' fill whitesmoke text -1,-1 'KARTTUR' fill grey text 0,0 'KARTTUR' " -transparent grey -fuzz 90% DstImage.ext
Nested into the command overlaying the vector to an existing image, the command becomes:
$ convert SrcImage.ext \C -background none -resize wxh! SrcVector.svg \) -composite \C -size wxh xc:none -font Trebuchet -pointsize point -gravity center -draw "fill silver text 1,1 'KARTTUR' fill whitesmoke text -1,-1 'KARTTUR' fill grey text 0,0 'KARTTUR' " -transparent grey -fuzz 90% \) -composite DstImage.ext
And then looping this command for all images in a folder, while saving the DstImage with the same name as the SrcImage but as a compressed jpg in a sub-folder (pub-images) (see this post for details on the command-line batch processing):
$ for i in *.tif; do convert "$i" \C -background none -resize wxh! SrcVector.svg \) -composite \C -size wxh xc:none -font Trebuchet -pointsize point -gravity center -draw "fill silver text 1,1 'KARTTUR' fill whitesmoke text -1,-1 'KARTTUR' fill grey text 0,0 'KARTTUR' " -transparent grey -fuzz 90% \) -composite -quality 72 "pub-images/${i%.*}.jpg"; done