
These instructions are for creating a GithHub repository with a frame project linking together all python packages that constitute Karttur’s GeoImagine Framework. If you are looking for how to clone the ready version of the complete framework, continue to the post Git clone with Eclipse post.
Introduction
Developing my code and learning more about version control and Eclipse, I have come to the point where I need to setup Karttur´s GeoImagine Framework as a distributed version control system, or Git. There are different options for how to go about this. I chose to use GitHub and Eclipse submodules, keeping separate GitHub repositories (repos) for each python package and then joining all repos as submodules in a main-frame repo that functions like a container for the packages.
This post describes how to use submodules in a Git project for assembling a hierarchical PyDev project, and details how Karttur’s GeoImagine Framework is organised on GitHub.
If you are primarily interested in Git submodules I recommend a more general instruction, like Using submodules in Git - Tutorial, Git Submodules basic explanation, Working with submodules or the youtube introduction Git Tutorial: All About Submodules.
Prerequisites
To follow the instructions in this post you need a GitHub account with a repository containing an empty PyDev project for Eclipse, created as explained in the post on Setup Eclipse teamed with GitHub repository. You also need to have the git command line tool installed.
If you want to work towards a functional setup of Karttur’s GeoImagine Framework, all you need to do is clone all the geoimagine-“package” python packages (repositories) on Karttur’s GitHub pages as submodules. To create a fully functional GeoImagine Framework you must also have installed the Spatial Data Integrated Development Environment (SPIDE) as outlined for Mac OSX in my blog Install and setup spatial data IDE, and summarised for Ubuntu in the post Spatial Data Integrated Development Environment for Ubuntu 18.04.
Setup Eclipse PyDev project with GitHub
As a result of the previous post Setup Eclipse teamed with GitHub repository, you should have a file and folder structure representing your local GitHub clone that looks like this (comments starting with “#” added for explanation in this text):
kt-gi-test01
|____.git #.git is a folder with hidden content not shown here
|____README.md #optional, only if you created the repository with a README
|____Karttur2019GitHub
| |____.project
| |____.pydevproject
where kt-gi-test01 is the local clone of the GitHub repository and Karttur2019GitHub the Eclipse PyDev project. .git is a hidden folder containing a dozen Git related files. README.md was created with the GitHub repository if you requested it, otherwise you do not have it.
Managing your local project
Karttur’s GeoImagine Framework is built from approximately 40 python packages, all specifically written to be part of the Framework. These packages need to be added to the combined GitHub / Eclipse project as submodules. But before we can link the packages/submodules, you must create a frame (core or top) python package. Then all of the packages will be linked to the frame package.
Create the project python frame package
To create the python frame package, return to Eclipse and locate your project (Karttur2019GitHub) in the Package Explorer (navigation) window. Right click and from the pop-out menu select:
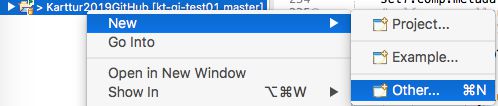
In the window Select a Wizard that opens, select the option and click
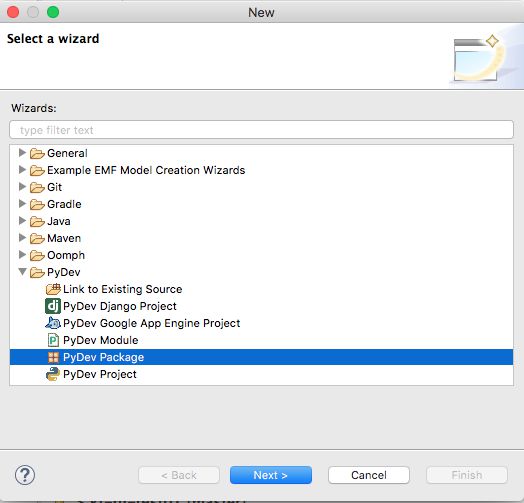
In the window Create a new Python package just fill in the name of your frame package (e.g. geoimagine).
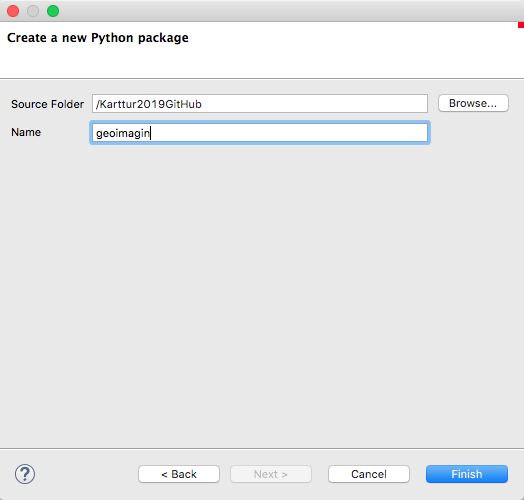
Click to create the package geoimagine. If you look in Atom or use the ls -a command with the terminal you should see that your local project have, at least, the following file/folder structure.
kt-gi-test01
|____.git
|____Karttur2019GitHub
| |____.project
| |____.pydevproject
| |____geoimagine
| | |______init__.py
Locate Karttur’s GitHub repository
Your project does not yet contain any actual code. Before adding the python packages of Karttur’s GeoImagine Framework as submodules you need to check out which python packages are available. Do that by either looking directly in Karttur’s GitHub account (under the tab repositories or check the list and links at the packages page in the GeoImagine blog.
In Karttur’s GitHub pages all repos containing python packages belonging to the GeoImagine Framework are named geoimagine-“package”, where package is the actual package name to be used in the hierarchical Eclipse PyDev project.
Add python package repo as submodule
When assembling Karttur’s complete GeoImagine Framework all the repositories with python packages (i.e. those named geoimagine-*) must be located directly under the GitHub python frame package (named geoimagine in this tutorial). To add the first python package (repository), start the Terminal and change directory to the python frame package:
$ cd path/to/localGitHubClone/EclipseProject/PythonPackage
which, with the names used in this example, and on my machine, becomes:
$ cd /Users/thomasgumbricht/GitHub/kt-gi-test01/Karttur2019GitHub/geoimagine
Check out that you are in the correct place by printing working directory $ pwd.
The first submodule (= repository = python package) that you are going to add is setup_db (where the repository name should then be “geoimagine-setup_db”). The Terminal command for adding a submodules is:
$ git submodule add “url” name
where url is the url path to the GitHub repository to add, and name is the name the added url will get in the your main (target) repository. Adding the repository geoimagine-setup_db as a python package called setup_db thus becomes:
$ git submodule add https://github.com/karttur/geoimagine-setup_db setup_db</span class=’terminal’>
If you check online (www.github.com) there should be no changes (yet) in the main repo (kt-gi-test01). But if you check the local clone you should see several changes. At the top level there should be a new hidden file, .gitmodules, and then the frame python package (geoimagine) should contain a new sub-package called setup_db. The content of your project (main repository) should now be something like this:
kt-gi-test01
|____.git
|____.gitmodules
|____Karttur2019GitHub
| |____.project
| |____.pydevproject
| |____geoimagine
| | |______init__.py
| | |____setup_db
| | | |____.git
| | | |______init__.py
| | | |____version.py
| | | |____setup_db_main.py
| | | |____README.md
| | | |____setup_db_class.py
| | | |____.gitignore
| | | |____doc #folder with text and xml documents, content not shown here
All GeoImagine Python Packages
Below are the commands for adding all GeoImagine packages (repositories) as submodules (September 2019). You can run all the commands sequentially. You can also save the code as a shell script file (.sh) and run all the commands by executing the shell script.
git submodule add https://github.com/karttur/geoimagine-kartturmain kartturmain
git submodule add https://github.com/karttur/geoimagine-ancillary ancillary
git submodule add https://github.com/karttur/geoimagine-dem dem
git submodule add https://github.com/karttur/geoimagine-endmembers endmembers
git submodule add https://github.com/karttur/geoimagine-export export
git submodule add https://github.com/karttur/geoimagine-extract extract
git submodule add https://github.com/karttur/geoimagine-gdalutilities gdalutilities
git submodule add https://github.com/karttur/geoimagine-gis gis
git submodule add https://github.com/karttur/geoimagine-grace grace
git submodule add https://github.com/karttur/geoimagine-image image
git submodule add https://github.com/karttur/geoimagine-jekyllise jekyllise
git submodule add https://github.com/karttur/geoimagine-ktgraphics ktgraphics
git submodule add https://github.com/karttur/geoimagine-ktnumba ktnumba
git submodule add https://github.com/karttur/geoimagine-ktpandas ktpandas
git submodule add https://github.com/karttur/geoimagine-landsat landsat
git submodule add https://github.com/karttur/geoimagine-layout layout
git submodule add https://github.com/karttur/geoimagine-mask mask
git submodule add https://github.com/karttur/geoimagine-modis modis
git submodule add https://github.com/karttur/geoimagine-overlay overlay
git submodule add https://github.com/karttur/geoimagine-postgresdb postgresdb
git submodule add https://github.com/karttur/geoimagine-projects projects
git submodule add https://github.com/karttur/geoimagine-region region
git submodule add https://github.com/karttur/geoimagine-scalar scalar
git submodule add https://github.com/karttur/geoimagine-sentinel sentinel
git submodule add https://github.com/karttur/geoimagine-setup_db setup_db
git submodule add https://github.com/karttur/geoimagine-setup_process setup_process
git submodule add https://github.com/karttur/geoimagine-smap smap
git submodule add https://github.com/karttur/geoimagine-soilmoisture soilmoisture
git submodule add https://github.com/karttur/geoimagine-specials specials
git submodule add https://github.com/karttur/geoimagine-sqldumps sqldumps
git submodule add https://github.com/karttur/geoimagine-support support
git submodule add https://github.com/karttur/geoimagine-timeseries timeseries
git submodule add https://github.com/karttur/geoimagine-transform transform
git submodule add https://github.com/karttur/geoimagine-updatedb updatedb
git submodule add https://github.com/karttur/geoimagine-userproj userproj
git submodule add https://github.com/karttur/geoimagine-zipper zipper
Start using Karttur’s GeoImaginge Framework
If everything worked out correctly, you should now be able to start using (your customized version of) Karttur’s GeoImagine Framework. But remember, you have to have setup the complete SPIDE as well as created a customised Python environment that is linked to Eclipse as the Python interpreter. The instructions for how to create a virtual python environment in Anaconda is covered in my post on Conda virtual environments.
Once you have installed all the required component for SPIDE and your Eclipse frame project is up and running, the next step is to prepare the solution for Database connection.