
NOTE, 1 October 2020 the label ‘main’ was replaced by ‘main’ for the default repo branch.
Introduction
This post is a manual on how to create and manage this blog (git command line) using the local git command line tool.
Prerequisits
You have to have a GitHub account, preferably set up to allow access using SSH, as outlined in the post on Remote repositories with GitHub. The content and layout of this blog is built using Jekyll, a static web-site generator. To follow this post you do not need to use Jekyll, but the trick is that GitHub is set up for handling Jekyll and create static web-pages (blogs for example) from Jekyll. And it is all for free. To learn about Jekyll, and how I created my blogs and pages, please see Set up blog tools: Jekyll and Atom and Setup Jekyll Theme Blog.
Creating a new GitHub repo
You can only create an online GitHub repo using a browser while being logged in to your GitHub account. Explained in the GitHub page on Creating a new repository. However, you only need to create the repo, everything else can be done from your local command line as outlined on another of GitHub´s help pages Adding an existing project to GitHub using the command line.
Creating a new gh-pages blog repo
As an example of setting up and managing a repo after only creating it online, this post will take you through how to create a repo for gh-pages - that is the GitHub system for free publishing of web-pages using Jekyll.
A GitHub repo for publishing must replace the default branch main with a branch named gh-pages. Thus, the setup of gh-pages using the local command line tool is a bit more complicated compared to setting up an ordinary repo with branches.
First you have to go to your online GitHub account and create a new repo. Just the repo name, nothing else, then click the button, as shown below.
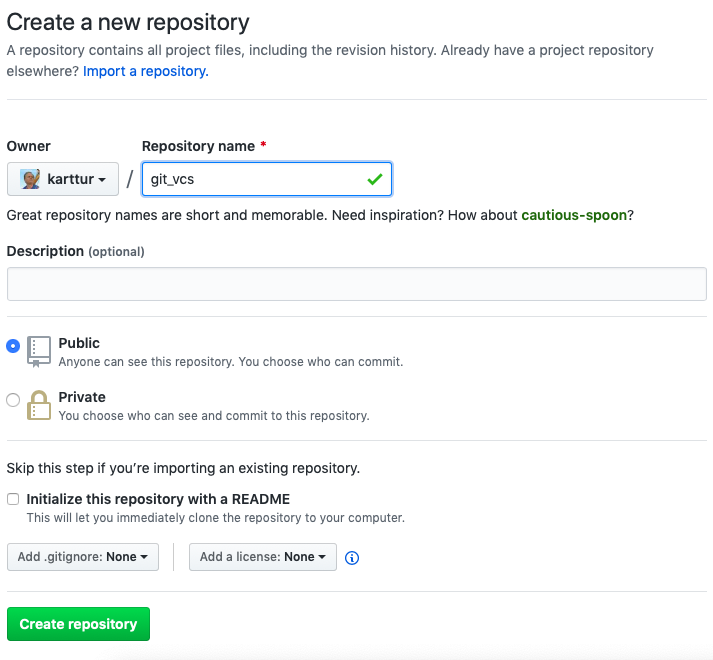
When the new repo is created, GitHub will show a page with hints on how to proceed with “Quick setup…” and other options.

Create local repo
Open a Terminal window and change directory cd to the parent folder where you want to keep the local clone.
Alternative I
 When the new repo is created, click on the green button . There are (in November 2020) 4 alternatives for cloning, plus the additional options [Open with GitHub Desktop] and [Download ZIP]. Copy the text for the clone alternative [SSH], as shown in the figure to the right. Return to the local terminal command line, and make sure you are in the parent directory where you want to place the local clone. Then type (but do not execute):
$ git clone
If you followed the instructions in the previous section, you can now just paste the SSH link from your clipboard to the command line:
$ git clone git@github.com:karttur/”repo”.git</span
Change directory (cd) to the cloned repo:
$ cd “repo”</span
Alternative II
Create a new directory, the easiest is to name it identical with your newly created online repo:
$ mkdir git-vcs
cd to the new directory and initiate git:
$ cd git-vcs
$ git init
You can also initiate the local repo from the parent:
$ git init git-vcs
$ cd git-vcs
Configure repo
To get the new repo started, configure the local repo user and email if they differ from your global user and email:
$ git config user.name repo-username
$ git config -- user.email email@example.com
Check the branch of your local repo:
$ git branch
If should say * main. if there is no branch you need to create an initial branch. You can choose to create either main or gh-pages (or a branch with any other name), but as you might end up with a main branch let us first create main and then replace it with gh-pages.
$ git checkout -b main
Switched to a new branch 'main'
If you check the branch of your local repo:
$ git branch
\* main
If no branch is reported, this is because you have not yet staged and committed any content. You can then safely continue, just ignore that the branch name is not seen.
As noted above, for GitHub to be used for publishing web-pages, you need to replace main with gh-pages, not create gh-pages as a new branch from main. gh-pages is thus an orphan branch that takes the place of main. This is accomplished with the command:
$ git checkout --orphan gh-pages
Switched to a new branch 'gh-pages'
Commit the changes
git commit -m “created gh-pages”
[gh-pages (root-commit) 8934df7] created gh-pages
 2 files changed, 676 insertions(+)
 create mode 100644 LICENSE
 create mode 100644 README.md
If you rerun the command:
$ git branch
\* gh-pages
  main
Create some content
At this stage you need to create some content, either a complete jekyll page, or you can start with a README.md:
$ pico README.md
# blog on command line based git processing
Hit [ctrl]+[X] to exit pico and save the edits by pressing Y when asked.
stage and commit
stage and commit the changes you have made, they will belong the branch gh-pages:
$ git add .
$ git commit -m 'Created README.md'
[gh-pages (root-commit) aa6a314] Created README.md
 X files changed, Y insertions(+)
 create mode ...
 ...
Again try the command:
$ git branch
\* gh-pages
This time, gh-pages should be your only branch. If not, you need to delete other branches.
$ git branch -d [branch]
or to force delete if the branch contains un-megred changes:
$ git branch -D [branch]
add remote
Your local account is not linked to any of your online GitHub repos. To link it, execute the command:
$ git remote add origin git@github.com:”yourGitHubAccount”/git-vcs.git
Before pushing to our, completely empty, online GitHub repo, stage and commit any changes.
git push
The local repo now contains a single branch, gh-pages, with some novel content that is staged and commited. push the content of the repo to your online account:
$ git push origin gh-pages
Enumerating objects: 95, done.
Counting objects: 100% (95/95), done.
Delta compression using up to 4 threads
Compressing objects: 100% (88/88), done.
Writing objects: 100% (95/95), 3.31 MiB | 3.68 MiB/s, done.
Total 95 (delta 4), reused 0 (delta 0)
remote: Resolving deltas: 100% (4/4), done.
To github.com:karttur/git-vcs.git
 * [new branch]      gh-pages -> gh-pages
As you see from the last line, you online GitHub repository got a new branch, gh-pages.
stage and commit changes
I created a complete suite of Jekyll pages, the blog you are looking at now. But I forgot to update my Jekyll configuration file, _config.yml. I also added a figure and then this post is itself progressing for every new part I write. After completing these edits, I ran the following sequence of commands:
$ git add .
$ git commit -am "initial updates"
$ git push origin gh-pages
[gh-pages 7e07cc9] initial updates
 3 files changed, 189 insertions(+), 3 deletions(-)
 create mode 100644 images/github-create-a-new-repo-git_vcs.png
(base) Thomass-MacBook-Air:git-vcs thomasgumbricht$ git push origin gh-pages
Enumerating objects: 14, done.
Counting objects: 100% (14/14), done.
Delta compression using up to 4 threads
Compressing objects: 100% (7/7), done.
Writing objects: 100% (8/8), 93.21 KiB | 15.53 MiB/s, done.
Total 8 (delta 5), reused 0 (delta 0)
remote: Resolving deltas: 100% (5/5), completed with 5 local objects.
To github.com:karttur/git-vcs.git
   aa6a314..7e07cc9  gh-pages -> gh-pages
It turned out that my documents had several spelling mistakes, and I also changed the names of all the posts. There are also some further posts I need to write. If you look at the online repo for this blog, you will thus see further commits.